
A Kenwood robot bowl that refuses to move after a kneading or mixing session is a situation more common than one might think. The problem almost never stems from a serious mechanical failure. It is most often due to a misunderstood safety mechanism, food residues accumulated on the base, or handling that does not follow the sequence specified by the manufacturer.
This article details the technical causes of this blockage and the actions that can remedy it without damaging the appliance.
Further reading : How to Choose the Right Size on Zalando: Tips for Men and Women
Kenwood Locking Mechanism: Why the Bowl Seems Stuck
Kenwood stand mixers (Chef, kMix, Multipro ranges) incorporate a mechanical locking system related to the anti-start safety. The bowl is held in position by a set of notches and position sensors that prevent the motor from turning if the bowl is not properly engaged.
This locking mechanism works in both directions: it locks the bowl during use, but it can also prevent its removal if the components are not perfectly realigned. Recent manuals for the Multipro Go and kMix ranges specify that the bowl remains mechanically locked as long as certain sensors are not aligned, which gives the impression of a stuck bowl while the safety is simply doing its job.
You may also like : How to Choose the Right Name on Your Plane Ticket: Tips and Key Steps
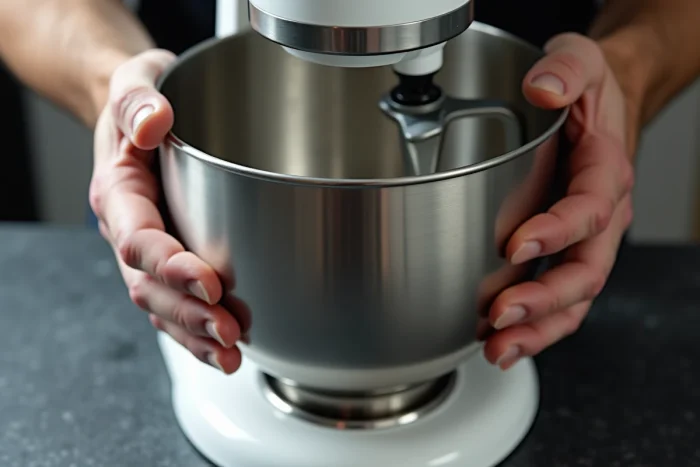
Before forcing it, one must understand that pulling vertically on a locked bowl risks damaging the fixing notches. Removal always requires a prior rotation.
For those experiencing this problem with a stand mixer, a useful resource allows you to easily remove the bowl from the Kenwood robot by following a step-by-step method suitable for several models.
Recommended Removal Sequence by Kenwood
The official Kenwood FAQ (published on the De’Longhi website) describes a precise sequence that most online content does not fully replicate. It relies on three steps to be followed in order.
- Raise the arm (robot head) to the high position, fully lifted. As long as the arm is lowered, the locking mechanism remains engaged on certain models.
- Check that the speed selector is in the stop position. On models equipped with a rotary switch, an intermediate position may be sufficient to maintain the lock.
- Gently turn the bowl in the opposite direction to the lock (usually counterclockwise), then lift it without forcing. The rotation movement should be brief; a few degrees are enough to disengage the notches.
The rotation gesture always precedes the vertical pull. Reversing this order is the most common cause of persistent blockage. Most users attempt to lift the bowl directly, which further embeds the locking notches.
Food Residues on the Base of the Kenwood Bowl: The Invisible Cause
When the removal sequence is correct but the bowl still resists, the problem often comes from outside the bowl. Feedback from specialized forums frequently points to the role of residues accumulated between the bowl and the base of the robot.
Cooked sugar, dried dough, splashes of caramel or melted butter: these substances infiltrate the threading and the contact area between the bowl and its base. Over time, these residues create an adhesion that adds to the mechanical locking.
Cleaning this area is rarely mentioned in the quick guides provided with the appliance. It requires removing the bowl (when still possible) and inspecting the base of the robot, particularly the grooves where the bowl clicks into place.
Cleaning the Threading and Base of the Robot
A warm, damp cloth is sufficient for recent residues. For cooked sugar or hardened caramel, applying a cloth soaked in hot water for a few minutes softens the material without risking damage to the electrical components, as long as water is not allowed to flow towards the motor block.
Some users report having resolved the blockage by applying a very thin layer of food-grade lubricant on the threading after cleaning. This practice is not recommended by Kenwood in its manuals, but field feedback indicates that it facilitates subsequent removals. The available data does not allow for conclusions about any potential long-term effects on seals or sensors.

Kenwood kMix Bowl with Removable Ring: A Special Case
The kMix models have a particularity: the bowl is equipped with a removable ring that screws onto the base. When an intense kneading session occurs, the ring can tighten due to friction and turn independently of the bowl.
The symptom is characteristic: when turning the bowl to remove it, the ring remains fixed and the bowl slides inside the ring without anything moving. The difficulty lies in the fact that two distinct pieces must be handled separately.
To unlock this configuration, one must firmly hold the ring with one hand while turning the bowl with the other. If the ring itself is stuck on the base, passing a warm cloth around its junction with the base allows the metal to slightly expand and facilitate rotation. Forcing with a tool (screwdriver, pliers) is to be avoided: the threading of the ring is aluminum on most kMix models, and it deforms easily under lateral pressure.
When the Kenwood Robot Bowl Remains Stuck Despite Everything
If the bowl does not yield after following the official sequence, cleaning the base, and checking the positioning of the arm and selector, the problem may be structural. A deformed locking notch, a misaligned position sensor after a shock, or a threading damaged by forced removal attempts are causes that require technical intervention.
Kenwood recommends in this case to contact an authorized repairer rather than disassembling the base oneself. The motor block contains live electrical components, and the base fixing screws are often non-standard security screws.
Replacing a bowl or fixing ring is possible through the Kenwood spare parts network. Before ordering, noting the exact model reference (inscribed under the robot’s base) helps avoid compatibility errors between ranges.